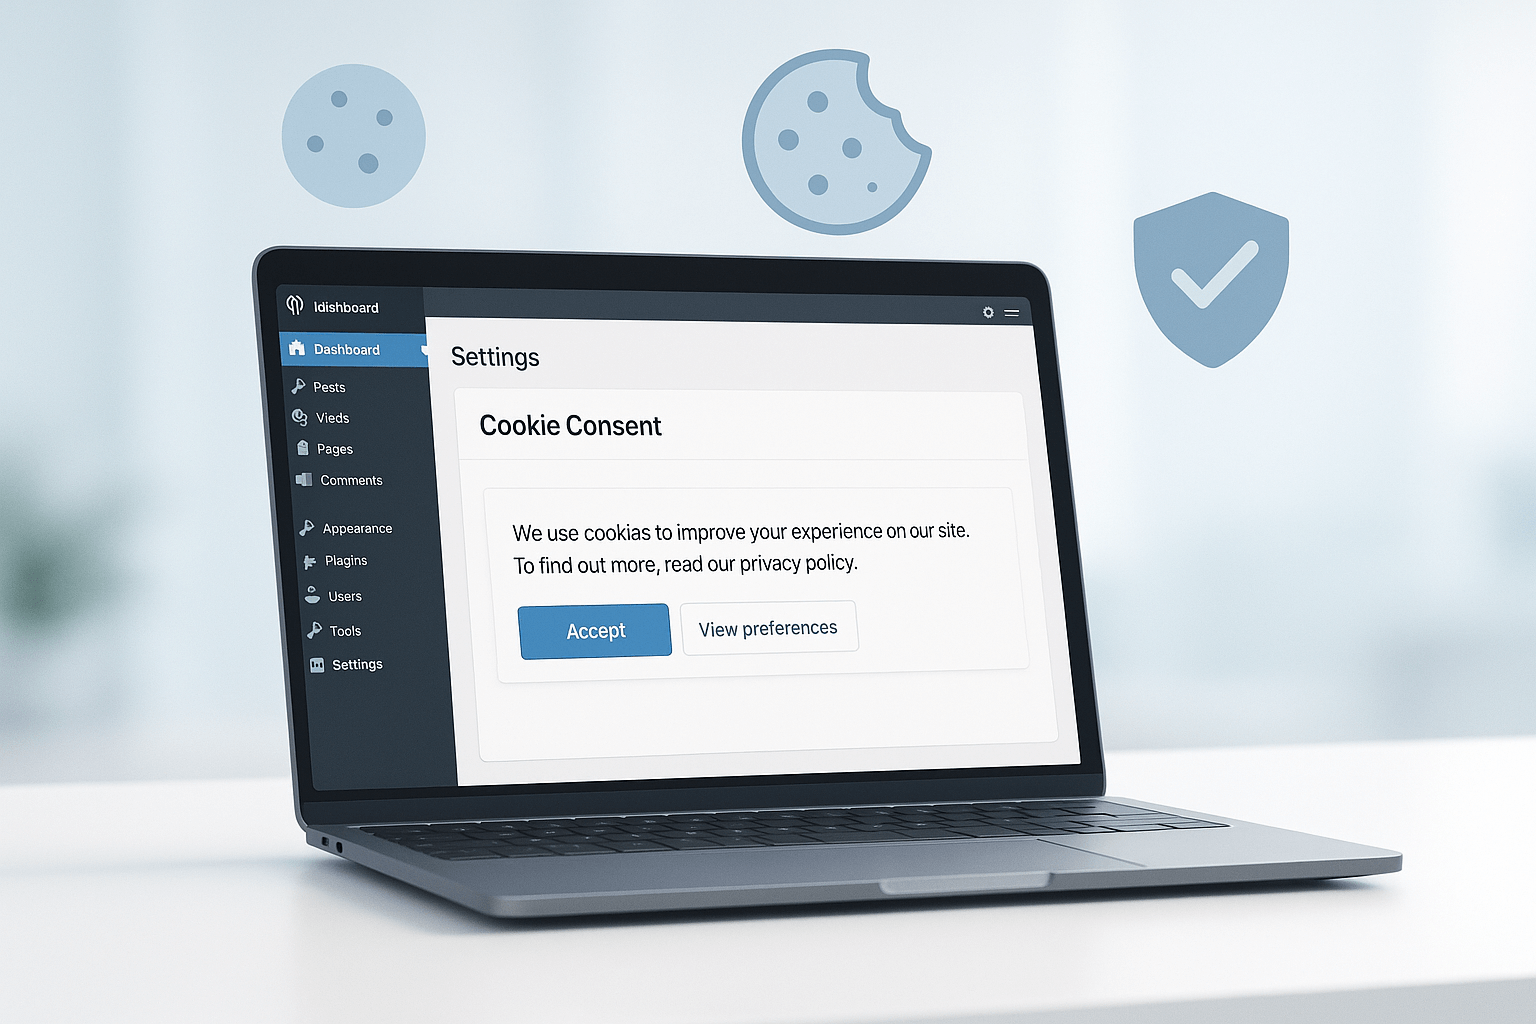
Why Consent Banners Matter and Why Choose Cookiebot
In recent years, privacy has become a big issue online and that’s why consent notification banners were introduced. The one I’ve used over the years when setting up websites for people is Cookie Bot because if you are a very small website, it’s actually free to use. With 2.3 million websites and apps on the platform, using this platform, I would wager you have very likely clicked on one of their acceptance banners before. So, why choose them? Well, they are a cookie consent solution and they help to ensure the compliant use of cookies on your website.
What you will learn
- Why online privacy matters today.
- What consent banners do for your visitors.
- When you need a consent tool: ads, analytics, and other trackers.
- Who Cookiebot by Usercentrics is and why it’s trusted and certified.
- How Cookiebot helps you follow cookie rules on your site.
- How Cookiebot gives you control over cookies and trackers.
- Why trustworthy consent collection protects you and your users.
- What a site scan does and what you can expect to see.
Context from the demo
- The video shows a website for a digital studio. A small preview window shows the speaker while the site is on screen.
- The screen then switches to the Cookiebot website. You can see messages about compliance, control over cookies, and trustworthy consent.
- The page highlights that you can scan your website and read more details about how the tool works.
By the end of this lesson
- You will be able to explain why consent banners are needed on any site platform.
- You will know common cases that require consent (for example, Google Analytics and ads).
- You will recognize Cookiebot as a widely used, certified solution by Usercentrics.
- You will list the key benefits: compliance support, full cookie control, and reliable consent.
- You will be ready to scan your own site and see Cookiebot in action next.
Plans, Pricing, and Premium Features Overview
They have a free pricing plan. That’s limited to 50 subpages. You can get a 14-day free trial of these premium plans. Premium small will do for four or more domains with up to 350 subpages. You can do a lot of customization. There’s banner templates, geo targeting, automated scans.
Quick tour of plans
- Free plan: Good for very small sites. It’s limited to 50 subpages and has basic features.
- Premium trial: Try any premium plan for 14 days at no cost.
- Premium tiers scale with site size:
- Premium Light: For one domain with 50 subpages. The video shows a price of £6/month when viewed in the UK.
- Premium Small: Works for 4+ domains with up to 350 subpages.
- Higher tiers support very large sites, up to about 7,000 pages.
Key premium features
- Deep customization of your banner.
- Ready-made banner templates.
- Geo‑targeting to match local rules.
- Automated site scans to find cookies and trackers.
What you should take away
- Start free if your site is tiny, or use the 14‑day trial to test premium.
- Pick a tier based on domains and subpage count.
- Premium adds the tools most teams want: customization, templates, geo‑targeting, and automated scans.
Account Setup and Banner Configuration Essentials
Once you’ve set up your account, you’ll get dropped into this onboarding. Very simple. This is where we get to configure what the visitor sees. In terms of compliance, what have we got? But we’ve got multi-level, accept only, accept, decline. Be aware of the position because if you’ve got an accessibility widget or maybe you’ve got a chatbot on there… you can put this wherever you’ve got the free space so it doesn’t clash.
What you’ll do here
- Complete the quick onboarding (it’s optional).
- Add your website and pick your country.
- Configure how the banner looks and behaves.
- Review consent text and languages.
- Place the privacy button where it won’t clash with other tools.
Step-by-step
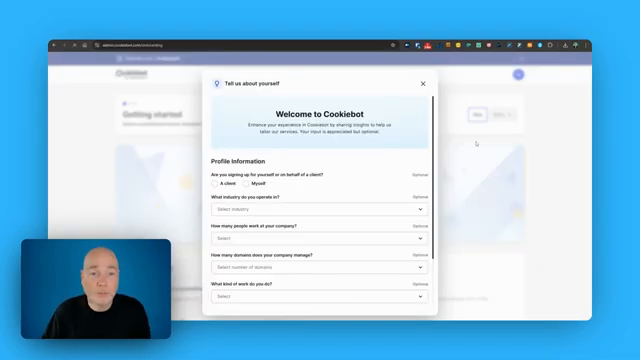
- Finish the optional onboarding
- You’ll see a “Welcome to Cookiebot” pop‑up (as in the screenshot).
- Choose if you’re setting up for a client or yourself.
- Pick your industry, company size, domains, and role if you want. All fields are optional. You can press Next to skip.
- Add your website
- Enter your website domain.
- Select your country. This affects the pricing currency shown (for example, UK shows pounds).
- Choose your banner layout
- Decide what visitors see first:
- Dialog: a larger box in the middle of the screen.
- Bar: a slim banner. You can place it at the top or bottom.
- Pick motion and position options like slide up. Many sites use a bottom bar, but it’s your call.
- Style the banner
- Show your logo on the banner if you have one.
- Choose a theme: light or dark. Mixed and outline button styles are available.
- Set compliance options
- Select the controls you want users to see:
- Multi‑level (granular choices).
- Accept only.
- Accept and Decline.
- You’ll see the preview update as you change settings.
- Decide who sees the banner
- Show it to all visitors, or target specific countries with geo‑targeting.
- Review consent content
- The consent text is pre‑filled. Read it and edit if needed.
- Add another language if your plan and needs require it.
- Place the privacy button
- The privacy button stays on your site so visitors can reopen choices.
- Place it where it won’t block other UI. Common conflicts are accessibility widgets or chatbots on the right side. Move it to any free space (for example, bottom left).
- Choose light or dark style to match your site.
On screen in the video
- Onboarding screen appears first (Scene 13).
- Add website details (Scene 14).
- Configure banner layout and see a live preview at the bottom (Scenes 15–20).
- Review the consent content (Scene 21).
- Adjust the privacy button location and theme (Scene 22).
You’re done when
- Your website is added, the banner layout and style are set, compliance options are chosen, and the privacy button is placed. Next, you’ll move on to implementation and scanning in the following sections.
Implementation Options and WordPress Plugin Installation
You’ve got different ways of implementing it. You can use Google Tag Manager if you’ve got that on your site. I’m going to be using WordPress. So, let’s head over to my site and we just go into plugins. Add plugins. User Centrics Cookie Bot. So, install that. activate it.
How to implement Cookiebot
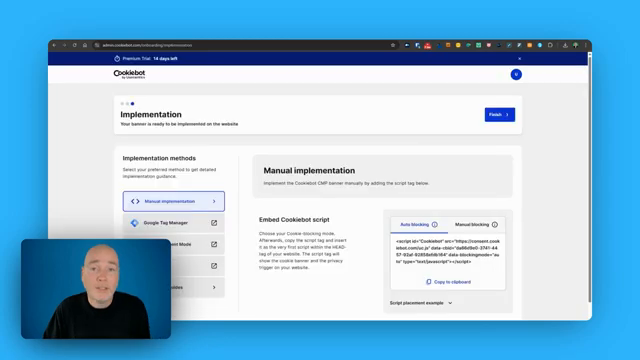
You are ready to put the banner on your site. In the video, the consent banner appears at the bottom left, then the view switches to the Implementation page with setup options. Here are the common ways to add it:
- Manual code snippet: Copy the script from the Implementation screen and paste it into your site’s HTML, usually before the closing head tag.
- Google Tag Manager: Add the Cookiebot tag if you already use GTM.
- Google Consent Mode: Available as an option on the Implementation screen.
- WordPress: Use the official plugin from Usercentrics (Cookiebot by Usercentrics).
Install the WordPress plugin
Follow these quick steps shown in the video:
- In your WordPress dashboard, go to Plugins > Add New.
- Search for “Usercentrics Cookiebot”. You will see “Cookiebot by Usercentrics”.
- Click Install.
- Click Activate.
- The plugin is now installed and ready for configuration in the next step.
Tips
- If your site has a chatbot or accessibility widget, place the banner or privacy button where it will not clash, like the bottom left (as shown on screen).
- Pick one implementation method only to avoid duplicate banners.
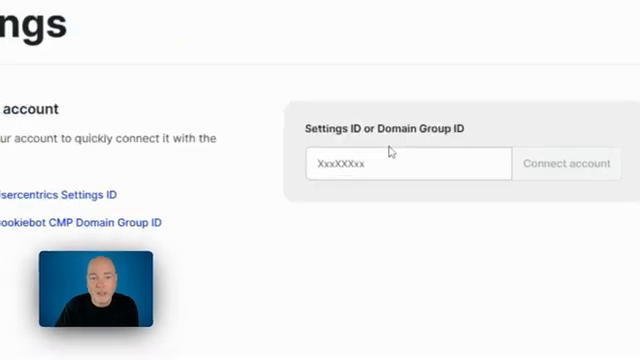
So we need the settings ID or domain group ID. This is the domain ID, the group ID. So, copy that… paste that to my plug-in. This dashboard is also where you can come back in… and you just hit save. After the 24 hours, you come back to the same page and you’ll see when the last scan was… and the various cookies and trackers it’s picked up on the website.
Lesson objectives
- Connect your Cookiebot account to your site with the correct ID.
- Know where to change banner type later and save.
- Check scan status and read the results.
- Confirm the banner goes live for visitors.
Visual cue from the video
- The screen switches to the Cookiebot settings and dashboard (Scenes 26–27).
- Then we jump to Domains (Scene 28) to view scan status.
- A tablet shows the live consent banner popping up (Scenes 29–31).
Step 1 — Grab your ID
- Open Cookiebot and go to Implementation.
- Scroll until you see your Domain Group ID.
- Copy it. You’ll use it in your site setup.
Step 2 — Paste the ID in WordPress
- Open the Cookiebot by Usercentrics plugin settings in WordPress.
- Paste the Settings ID/Domain Group ID into the field.
- Connect or save. That links your site to your Cookiebot account.
Step 3 — Adjust banner type any time
- In the Cookiebot dashboard, go back to Configuration.
- Switch from a bar to a dialog (or the other way) if you like.
- Hit Save. Your changes will apply to the site.
Step 4 — Wait for the scan and check results
- Cookiebot needs time to scan your site after setup.
- Come back after about 24 hours to Domains and Aliases.
- Click your website name to view:
- Last scan date and time.
- How many subpages were scanned.
- Cookies and trackers found.
Step 5 — Confirm you’re live
- Visit your website in a private window.
- The Cookiebot interface should pop up so visitors can make their choices.
- If you don’t see it, recheck the ID and plugin save.
Timing guide for a quick run-through
- Connect ID in WordPress: 2–3 minutes.
- Optional banner tweaks in Configuration: 2 minutes.
- Platform scan: allow ~24 hours.
- Live check and quick test: 1 minute.
You’re done when
- Your ID is connected, settings are saved, and the scan shows recent results.
- On visit, the consent banner appears and lets users choose.